|
|
Support | Resource Center | PhotoImpact Pro
Creating a Video CD Slideshow with Photo Explorer
(Part 1 -
Part 2)
Step 3: Set the Overall Slide
Show Options
Now that your slide show contains all the individual components, it’s
time to set some overall options before committing your creation to CD.
 Click
the Slideshow Options button to display
the Slideshow Options dialog box. Click
the Slideshow Options button to display
the Slideshow Options dialog box.
 Set
the Transition option to specify a special dissolve or wipe effect that
will take place between each slide. You can select from one of more
than 40 different transitions in the list. Select Random
if you want different transitions for each photo. Select None
if you prefer an abrupt “cut” from one slide to the next. Set
the Transition option to specify a special dissolve or wipe effect that
will take place between each slide. You can select from one of more
than 40 different transitions in the list. Select Random
if you want different transitions for each photo. Select None
if you prefer an abrupt “cut” from one slide to the next.
- Set the Playback options to adjust the time delay between slide changes.
Select Default duration and type a
number to set a specifi c time for each slide to appear on screen. Or
select Control manually with keyboard or
mouse if you want each slide to remain on screen until you press
a key or click the mouse button. Select Repeat
continuously if you want your slideshow to loop indefinitely.
- Set the Text on screen options to control what text appears on the
screen during the slideshow. For this example, select Slideshow
title and type My Hawaii Vacation
in the box. Also select Description
to display the caption you created for each slide. (The other options
are File name and Date
taken.) Finally click the lower-right
option to choose the position on the screen where you want the text
to be displayed.
- Set the Text attribute options to control the appearance of the title
and description text. Click the color box and select white
from the Color dialog box that appears and click OK.
Similarly, you can click the Font
button and select the font (Arial),
style (Regular), and size (14)
from the Font dialog box and click OK.
To ensure that the text shows up regardless of the background, select
the Use text background option and
then click the adjacent color box and choose black
from the Color dialog box and click OK.
- Set the options Other options as needed. Select the Play
sounds option to play any sound annotations you added to your
slides.
- Click OK once you have finished
adjusting the slide show options.
Step 4: Burn a Video Slide
Show to CD
With the images selected and the slide show options set, you’re
ready to store your slide show on a CD for convenient playback on your
computer or TV. All that remains is to burn a CD in the proper format.
Burn a video slide show for computer viewing To store your slide show
on a CD for use on a computer, do the following:
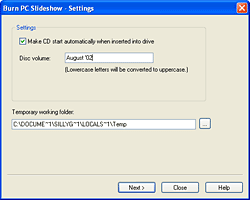
- Click the Burn PC Slideshow
button to display the Burn PC Slideshow dialog box.
- Check the Make CD start automatically
when inserted into drive option and then type Hawaii
Vacation Slideshow in the Disc
volume text box.
- Insert a blank CD into your CD-R drive and click Next.
The Finish screen appears.
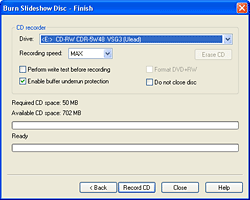
- You may experience a brief pause as Photo Explorer detects your
CDR/ CDRW drive(s). Select your CD-R drive from the Drive
list and then click the Record CD
button.
- When Photo Explorer finishes recording the slide show, remove
the CD from the drive and label it.
|
|
 |

|
Your video slide show is ready for viewing! Burn a video slide show
for TV viewing To store your slide show on a CD to view on a TV set,
do the following:
|
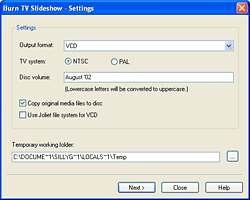
- Click the Burn TV Slideshow
button to display the Burn TV Slideshow dialog box.
- Select NTSC (select PAL if you’re in a location that uses
that TV standard) and then type Hawaii
Vacation Slideshow in the Disc
volume box.
- Insert a blank CD into your CD-R drive and click Next.
The Finish screen appears.
- You may experience a brief pause as Photo Explorer detects your
CDR/ CDRW drive(s). Select your CD-R drive from the Drive
list and then click the Record CD
button.
- When Photo Explorer fi nishes recording the slide show, remove
the CD from the drive and label it. Your video CD should play
back in most video DVD players and similar devices.
|
|
 |
|
Note: Requires DVD player
that supports Video CD (VCD) playback.
(Part
1 - Part 2)
Back
to PhotoImpact Pro Tutorials
|