| Make your guests feel welcome while decorating
your table with Fun ID cards. All you need is heavy-weight paper such as
cardstock. |
| |
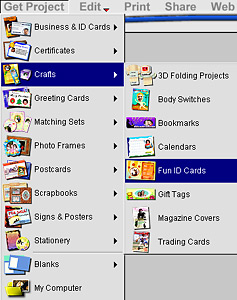
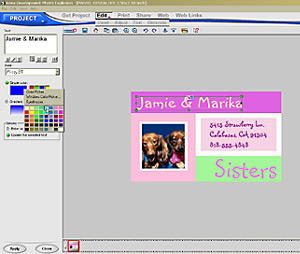
Step 1: Choosing a Project
Launch Photo Explosion and select Create Project on the opening screen. In the
Get Project menu select Crafts and choose Fun ID Cards.
|
|
 |
| |
|
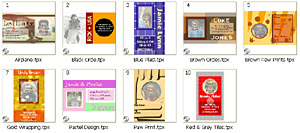
Step 2: Selecting a Template
Choose a template by double-clicking it. Several ready-made styles are
provided. However, you can customize any template by changing the background,
text, and photo.
|
|
 |
| |
|
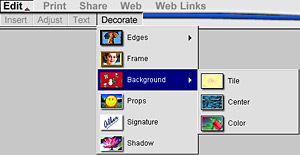
Step 3: Changing the Background
Change the template's background in the Decorate menu. Select Background and
choose Tile, Center or Color. Select a background that you like and click
Apply.
|
|
 |
| |
|
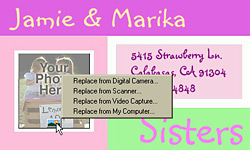
Step 4: Inserting a Photo
The template comes with a placeholder picture. Replace it with your own image
by clicking on the placeholder to select it and then clicking on the
rectangular icon below it. Then get your image from your digital camera,
scanner, video capture or computer files. Once it's in the template, you can
move it by dragging and dropping to the desired location. To resize it, go to
the Edit menu, choose Adjust and select Rotate & Resize. Then click and
pull any of the square nodes surrounding the image.
|
|

|
| |
|
Step 5: Customizing the Text
Double-click the template's text. The text tools will automatically appear on
the left, allowing you to write your own message and change the font by
choosing a color, texture or a gradient effect. Select Apply when done. To move
your text, simply drag and drop it to the desired location. To resize it, click
and pull any of the square nodes surrounding the text.
Note: Add pizzazz to your text with a shadow, special effects,
reshaping or transformation. These options are in the Edit menu under Text.
|
|
 |
| |
|
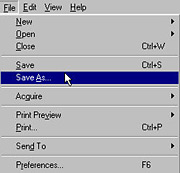
Step 6 Making Multiple Fun ID Cards
When you have finished designing your first name card, save your project by
choosing Save in the File menu. To make multiple ID cards, open the original
file, double-click the text to change the guest's name and choose Save As in
the File menu to give the new guest name card a new file name. Be sure to
select Save As rather than Save or you will replace the original guest name
card with the new one.
|
|
 |
| |
|
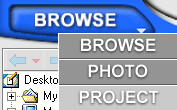
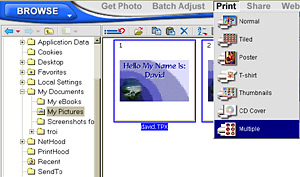
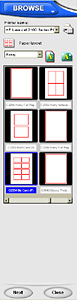
Step 7: Printing
Go to Browse mode and select the folder containing your name card files by
double clicking it. Select the files you wish to print by highlighting them
(try printing four ID cards at a time). Then choose Multiple in the Print menu.
|
|
 |
| |
|
On the left choose paper types and layouts. In Avery select
5395, Name Badge. Click Apply when done.
|
|
 |
| |
|
Although you are only printing 4 ID cards, all 8 cells in the
print template will be filled. Delete duplicate images by highlighting them and
pressing Delete on your keyboard. Drag and drop the remaining images into the
2nd and 4th rows (so you can fold them in half later).
|
|

|
| |
|
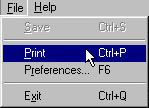
To print, go to the File menu and choose Print.
|
|
 |
| |
| When you're done printing, cut apart
the ID cards and you're all ready to go! |
| |
| Return to Tutorials |
| |