|
|
Support | Resource Center | PhotoImpact Pro
Putting Images into an Album (Part
1 - Part 2)
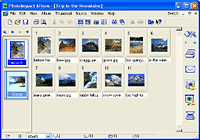
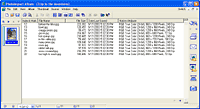
Step 2: Viewing your Album
After you create an album, you have a choice of four different ways to
view it. To select a viewing mode, click the corresponding button on the
toolbar or choose it from the Mode submenu
on the View menu.
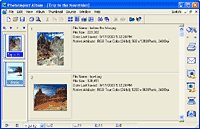
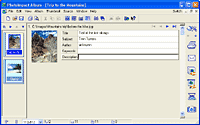
Step 3: Adding Image Info to an Album
PhotoImpact Album is more than just a tool to sort your images —
it’s also a convenient way to store information about the images
in the album. You can enter a title, subject, description, exposure information,
and more. The specific information you can add to each image depends on
which album template you chose. Here’s how to add a description
or other information to an image in an album.
- Open the album that contains the image you want to describe.
(Click the album’s icon in the Album Panel along the left
side of the PhotoImpact Album window.)
- Click the image thumbnail to select it, then click the View
in Data Entry Mode button on the toolbar. The album displays
the selected thumbnail alone accompanied by several fields to
the right.
- Type My favorite mountain
(or another description) in the Description
box. Repeat for the other information boxes.
- Use the Left and Right
arrows in the upper-right corner of the album window to move to
another image and enter information about it as well. Repeat as
needed for the other images in the album.
- When you’re finished adding information to your images,
click the View in Thumbnail Mode
button to return to regular album browsing mode.
Don’t be shy about building an entire library of albums.
Since an album only stores thumbnails of the images it contains,
you need not worry about album files consuming a lot of disk space.
|


|
(Part
1 - Part 2)
Back
to PhotoImpact Pro Tutorials
|