|
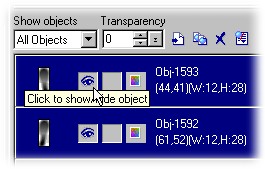
Support | Resource Center | PhotoImpact Pro Using Objects to Compose an Animation (Part 1 - Part 2 - Part 3 - Part 4) 6. Because you don't need all the objects on our first frame, you should "hide" all objects except for the background color and the paintbrush. To do this, from the Object Manager Panel, click Hide on those objects that we don't need. Then position the paintbrush to the upper left corner of the canvas.
7. On the Frame Panel below, double-click the first frame. Set delay time at 30. When you add more frames later, the delay time will be set at the one you last specify. 8. Next, click Duplicate Frame on the Frame Panel. 9. On your second frame, you will start the "painting" action. To do this, you need to create another object for the newly painted area. Right-click anywhere on the workspace and select New Blank Object.
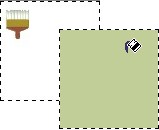
10. You'll notice that the entire workspace seems to be selected (marked by a marquee or dotted lines surrounding the workspace). Don't worry - your "new object" is simply transparent. Now let's fill it with color. On the Tool Panel, select the Fill Tool . Set the foreground color by clicking the color square for it and select the desired color for the paint (use Sage Green.) Then click your "new object" to fill it with your selected foreground color.
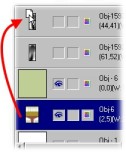
NOTE: If after adding the new object (to act as the painted area), our paintbrush disappears, then we need to reorganize the order of the objects in the workspace. Simply go to the Object Manager Panel and drag the paintbrush thumbnail over the paint thumbnail. Remember that the order of the thumbnail on the Object Manager Panel determines the order of the objects in the workspace.
(Part 1 - Part 2 - Part 3 - Part 4) Back to PhotoImpact Pro Tutorials
|