|
Support | Resource Center | PhotoImpact Pro Creating a Banner Advertisement (Part 1 - Part 2 - Part 3) An example of creating images in PhotoImpact
Pro 1. In PhotoImpact Pro, open a new file and set the canvas size to 480x60 pixels - same size as the animation project's canvas size. Five photos of food of the same size (about 100x80 pixels ) need to be placed in the workspace.
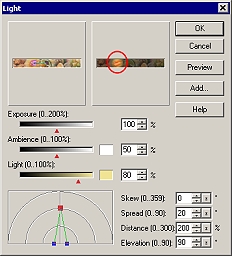
With the Selection Tool on the Tool Panel selected, set the Soft edge (on the Attribute Toolbar) to 40, set Fixed size to 100x80, then select an area that you need from an image and drag it onto the workspace. Do this until you get all five images. Then right-click and select Merge All. (You have to merge them together before you may apply the Light effect to it.) 2. Then, apply the Light effect. To apply this effect, select Effect>Magic and select Light. In the dialog box that opens, click Options for a customized effect.
4. Now save the image. Select File>Save As. This will be your first image file. 5. To apply the Light effect to the second photo, press Ctrl-Z to undo the effect on the first photo. Then again, select Effect>Magic, select Light, and click Options. Now adjust the red control point to the second image and click OK. Select File>Save As and save the image as another file. This will be your second image file.
6. Repeat the process in step 5 to move on and apply the Light effect to the next photo. Each time you save the image, save it as a different file. 7. Keep doing the above process until you get the fifth photo lit. By now, you should have five different image files, with each file having the spotlight on each food photo. 8. For the sixth image, do not apply
the Light effect. What you can do is, on the fifth image file, press Ctrl-Z
to undo the effect and save it as your sixth image file. Back to PhotoImpact Pro Tutorials
|
|||||||||||||||