|
Support | Resource Center | PhotoImpact Pro Seamless Animation Using Tweening (Part 1 - Part 2 - Part 3 - Part 4 - Part 5) We now have a set of frames with our objects in various positions. If you preview this animation, you will notice that the sequence looks jumpy.
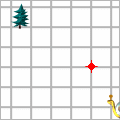
Now apply the Tween function to have a smoother transition between these frames. 8. On the Frame Panel, click Frame 1 (First position). Select the snail and the red dot in the workspace, then click Tween. 9. In the dialog box that opens, select the starting and ending frame (in this case, Frame 1 and Frame 2, or First and Second position) on the Frame tab. Also type in the number of frames (for this exercise, enter a value of "3") that you want GIF Animator to insert between Frame 1 and 2. (This will generate a smooth movement sequence of the snail and the red dot from Frame 1 to Frame 2 by automatically inserting a few frames in-between to animate these objects.) Enter "10" in Frame Delay to provide a small delay between frames. 10. On the Objects tab, select Currently selected objects. Also select Position. Then click Start Preview to see how the tweened objects look. 11. On the Frame Panel, you now have 4 frames before the Second position frame. This will be your first set of tweened sequence. 12. Repeat the Tweening process for the following frames: Between Second Position and Third Position At the end of this step, you should have a total of 18 frames, with three "tween" frames in between all frames named with Position. (Part 1 - Part 2 - Part 3 - Part 4 - Part 5) Back to PhotoImpact Pro Tutorials
|