|
Support | Resource Center | PhotoImpact Pro Correcting Photos Using Filters and Effects (Part 1 - Part 2 - Part 3) PhotoImpact is equipped with a comprehensive range of filters designed not only to adjust and correct photographic flaws, but also tools to simulate photographic effects and enhance images for striking results. A combination of techniques using PhotoImpact tools and filters enables you to bring the very best out of your photos. In this tutorial, some straightforward filters and effects will be applied one by one to balance the dark and light areas of the image and reveal detail by adjusting the lighting; to correct exaggerated perspective caused by lens distortion; and finally, to create the illusion of a narrower depth of field as an artistic finishing touch.
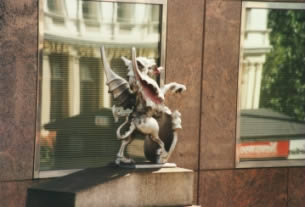
Open a photograph to be enhanced in PhotoImpact. The photograph should be of a reasonably high resolution to obtain good results. For a more natural effect, the image should ideally feature a subject in the foreground and various contrasting features in the background. Notice that exterior photographs taken on cloudy days or in the shadows of tall buildings are often somewhat dark, giving the impression of much lower levels of ambient light than were actually present. The sample photograph above (i.e., the Before image) appears overly dark due to the location of the statue between buildings. Step One: Add More Sunlight For this dark image, we will increase the Sunlight settings on the left panel. In this instance the setting is set to 10. To brighten the image, move the Cool - Warm slider to the right. Click OK. Notice that the overall lighting of the image has warmer tones.
Tip: The lighting levels in an interior photograph can be enhanced using the Enhance Lighting effect.
In this image, only the Trapezoidal settings need to be adjusted to correct the distortion. The center of the Trapezoidal distortion settings is indicated by the red cross on the preview window. Move the red cross to the center of the most distorted area. In this case, the distortion is more obvious at the top of the image than at the bottom. The graphics on each side of the slider bars on the dialog box indicates the direction in which adjustments should be made. In this image, the glass window on the right is shorter than the glass window on the left, so the slider bar is moved to the right to stretch the right side vertically. The glass windows are thinner at the top than at the bottom, so the bottom slider is moved to the left. Click OK.
Note: Because of the stretching required to remove the distortion in the image, the overall image size and dimensions are adjusted to accommodate such stretching. Peripheral sections of the image will be lost, unless Retain all image content is selected, which results in the stretched image fitting into a canvas of the same dimensions as the original image. Back to PhotoImpact Pro Tutorials
|